Many times I've been asked what the best digital camera to get is. The response is, as you've probably heard quite a few times, "it depends on what you want to do." And what you want to do creates a need. That's all very well but how do you know exactly what you need?
Once you work out what types of digital photos you want to improve then choosing a camera will seem difficult and confusing. In the end you will have a hard time and probably end up not choosing a digital camera at all and this is not good because your digital photos will remain the same. You can certainly have a great experience in digital photography, but if you have the right camera you'll find that this experience is vastly improved.
For starters, think about the digital photographs you have taken in the past and think about your frustration with them. Are they to dark? Is the lag time too long? Is it out of focus when you try to get long distance digital photos? Or alternatively are have you tried to get digital photos that seem out of focus up close, or you can't get close enough in to your subjects?
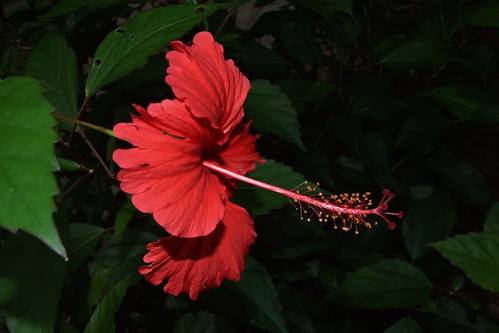
For example I have a subscriber who just loves to take digital photographs of flowers. She's a lady in her 60's and is an avid Gardner and asked me to help her to capture the brilliant colour and detail of her carefully grown flowers. I suggested that with the camera she had been using to date, her flowers would have two problems:
Colour saturation (which creates lack of detail) and the camera would not provide her with the ability to get focused shots up close, even when the "flower" setting was on, on her digital camera. She confirmed this was indeed the problem she was having. As a help, I gave her some pointers to what may help her digital photography experience by looking at the problems in the current digital camera, then finding an active solution.
The problem was that a lot of point and shoot digital cameras may be fantastic and feel like a bargain at $200 they just don't have the digital sensor capabilities to capture to fine detail when there is a bulk amount of colour in the scene. Let's take for example a digital photograph of a yellow rose. The digital camera would not be able to distinguish the detail in the petals up close because it gets lost in "all the yellow". Because the digital camera's sensor built for the bottom end range it's not able to capture this fine detail.
My subscriber was also having trouble with her detail in focus up close. Even though she was selecting the "flower" setting, it still was not as clear up close as it could be. And due to the colour saturation in her digital photos she was having difficulty getting the clear digital images that she imagined getting in her mind. I suggested that she may want to look at a digital camera with a capability to add macro lenses. I explained that the sensor would be able to pick up more detail in the colour of the flowers if she had better lenes for the macro photography that she wanted to do. A good macro lens would give her the detail up close, and she could get in even closer than before without losing focus or detail.
In the end my lady subscriber ended up choosing a Sony digital camera with interchangeable lenses and with a better sensor. She was extremely impressed with the new digital image quality her photographs were getting. She was able to photograph the petals up very close and even capture the tiny veins in the petals of the flowers.
I recommend you do the same. Think about the frustrations you've had in the past as then find a camera to suit. Try to look first at the digital cameras that have the features and facilities you are after, and then look at the whole range. Not the other way around. Looking at every single digital camera first may confuse you; its better to narrow your search down to the features first.
Happy shooting!
Article Source: http://EzineArticles.com/480971
Tuesday, June 23, 2015
Saturday, June 20, 2015
A Digital Photography Tip - The Secret Of Clear Digital Images
Recently I've been getting a lot of questions about clarity. This leads me to the answers about lenses. You know if you do not have a good lens you do not have a good photo- generally.
The reason I say that professional SLR is much better than a prosumer camera or a point and shoot is not because of my desire to look "pro" when I take photos its because of the amount of control you have over the photo. You can control the light so much more; you can control the exposure and the general aspects of the image. And with this freedom comes the choice of getting the clarity via the lens. To gain the ultimate freedom in picture clarity first of all you need to know what lens does what.
Fixed focal length lenses
A fixed focal length lens is a lens that is on most point and shoot and prosumer cameras. They are normally an average wide angle lens. It's kind of like a "mid range quality" lens. If you then take a zoom lens and compare the two, a fixed focal lens is smaller and often has a larger max aperture. This is good, because they work pretty well in low light situations. These lenses appear clearer than zoom lenses. The only problem here is that your person or subject can appear smaller than you would like unless you move in closer.
Zoom Lenses
And what of a zoom lens? Without going into overly technical details, zoom lenses often have more practical focal lengths for digital photography. They can give you a good angle perspective for filling the frame for example. These lenses are great if you need to take shots closer when it's impossible to get closer to something.
Optical zooms lenses are the best. My advice to you would be to forget digital zoom altogether. Digital zoom is not a real zoom, in other words it's not a true representation of what's there. You'll just get more noise on your image which can't really be edited.
The problem with zooms is that they loose light the closer you get. They have lower apertures and this can be difficult in low light conditions. In some situations it's possible to use the flash and have adequate lighting, but other times you use the zoom because you are far away from the subject and the flash is only effective a few meters away.
There is no general answer to "What lens should I get?" The answer is it depends on what your camera can do and what you want to do yourself. But the more you understand what lenses do what, the better off you are of making an informed decision and get the right lenses for the job.
Article Source: http://EzineArticles.com/236743
Sunday, June 14, 2015
Easy Digital Photography Techniques for Beginners
There are lots of methods to find out how to use your camera, but do these things make you a more productive photographer? The answer to that is "maybe". You see, the camera is just a tool to generate creative photos. It depends on how that tool is ultilised that determines the greatest and most stunning photographs.
Essential Digital Photography Techniques
To get spectacular pictures we first need to look at some fundamental photography techniques. The initial one I am able to share with you is find out about light. Anytime you learn about light and in what way it interacts with the direct environment then your photos will get better.
Examine shape and form- Where you place things in the photo is next. Continually consider the angles and shapes of the things you are shooting. Do they generate a balanced image that is satisfying to the eye? One method to master the techniques linked to photographing ideal composition is to see where these things guide our eye. Each time look for a balance and simplicity. Put into practice these things by taking photos of straightforward things that have nice straight lines, or curved lines and proportioned patterns. Do not have anything else in the surroundings.
A nice way to get started with this creative method is photographing architecture. Architecture is filled with lines. Take shots of walls, angles in the walls, look at where these lines direct us and the way it looks as a photo. This is great practice. This system of looking for symmetry will really improve your photography, ten fold in fact.
Easy Photography Techniques - Examining light
One of the simplest techniques I know is to examine and study light. Try this: every time you take a look at something, observe how intense the light is, what direction it is coming from, the amount of darks and lights it generates and the colour of that light. For the next 7 days, whenever you photograph something, write down what you saw and then how it appeared as a photo.
Once you have effectively understood this skill begin shooting your lines and curves. If you start taking photos in this manner you will notice that a) your technical skill increases and b) your photos begin to look artistic and a whole lot more interesting. It's not just simple to do, but a lot of fun. You will begin to feel like you are experiencing a link with light.
Your comprehension of light improves. As your appreciation improves, so do your photos. You will start to recognize what will work as a photograph just by looking at the scene in front of you. It's a fantastically positive and empowering feeling.
Better Photography Techniques
Enhanced photography techniques come with training. Practice takes time. Time needs dedication and a willingness to learn. One of the things that helped me to understand photography was the exploration of light and shape. An additional useful thing you can do is to write everything down in a notebook. Before you shoot write down notes about the light.
Ask yourself and write down the answer to:
What is the light doing?
How does it make your scene appear?
How does the light change the mood of your scene?
Next, write down:
• Notice how much light
• What direction it is coming from
• How much contrast it creates
• The colour of that light.
Then, if you are shooting in automatic, note down what the internal light meter is telling you as you point the camera to that scene. Make a note of the shutter speed and f stop it wishes to shoot at. (It will be incorrect and generally underexposed, but more about that another time.)
Then, switch your cameras mode to manual and alter the adjustments to what the auto setting just said. It will be wrong, so make sure you put the dial in the center, or slightly to the right hand side of the middle.
Subsequently, look at the lines and shape of the subjects in your photograph. Where do they guide your eyes? Are there any distracting elements in the scene that you really don't need?
Imagine that picture as a two dimensional medium and look again. Is there someone in the way? A tall tree that doesn't really look like it makes sense to be there? A lot of cars whizzing by that detracts from the drama and power of the construction? Every time ask yourself these things prior to photographing.
Digital Photography Professional Techniques
One of the greatest ways to become good at photography is becoming good at a photo editing program. Photoshop is an incredibly superb tool to have but it takes time to become skilled at it. It's very complex to the newbie so take some formal classes if you need to.
You can also learn Lightroom, which is a less complicated adaptation of Photoshop. It's less complicated to learn and you may not always need official instruction. Whichever way you decide to go, specialist methods come from not only better photography and shooting techniques but approaches in post processing.
Post processing is a term given to editing, sharpening and improving your photos in a software program. There are so many incredibly remarkable special effects you can apply in both Photoshop and Lightroom. Darkening the outer areas of a photo and increasing colour and contrast are just some of the simple functions within both programs. You can also add objects that were not there beforehand. You also have the capability to remove distracting things in the background.
These programs are dynamic for wedding and portrait photography as you can add depth to colour, generate softness for skin tones, make facial features glow and the eyes sparkle. A whole new world opens up to you after you realise what Photoshop and Lightroom can do, and, how much better your photos can appear.
You can become preoccupied for hours when you are post processing, so become skilled at good techniques. The last thing you want to do is spend 1 hour taking pictures and 6 hours editing all your photos. The faster your post processing methods are the better photographer you turn out to be.
On-Camera Flash Techniques for Digital Wedding and Portrait Photography
The worst way to use your flash in wedding and portrait photography is directly front-on. First, others detest the flash being blasted in their eyes. Secondly, the direct flash is not really designed for front on use (except if it's a unique circumstance, in which case it would be turned down to its lowest brightness.) The flash is meant for filling in the shadows.
Professionals usually have an external flash and point it up to the ceiling, to the side or position something over it to minimise its strong, white effects. I never ever use flash front-on for weddings and portraits since the light is too bright.
When we shoot with light that's bright and white on a person's face, we waste a lot of the subtle and softer details of a persons face. It makes people look horrible in photos!
Digital Black and White Photography Techniques
Techniques for shooting in black and white are no different to shooting in colour. However, on saying that, you may want to shoot black and white subjects with the intention of creating a black and white photo. That's okay too. If you feel like some really beautiful black and white photos then try to shoot items that have a naturally strong contrast. For example a white sign with black letters in front of a silver building may look really well suited. A person's face with red lipstick and intense eye make up looks great in black and white.
Digital Photography Lighting Techniques
I have covered how to assess light and how to employ the flash properly, but what about ambient light? Ambient light is the light that exists in the environment we are shooting in. Light from a window that fills a room is regarded as ambient light for example. It's vital to take note of ambient light just as much as other light sources.
Ambient light is reflected light. It's light that comes from a light source and fills up the environment without a noticeable direction. This is very critical to take note of as it determines how you photograph the scene. If you have heaps of ambient light you may have light evenly spread all the way through your photo. This is nice.
But what if that's not the effect you care for? What if you want a moody and sombre result instead? In that situation, you would try and photograph whilst the intense light source is at an angle. Using a directional light that generates strong shadows can really create a moody photograph.
The way light is contained within a scene has an effect on the way you take the photo and the capture the emotion of the photo. This is very crucial, do not forget this.
Canon Photography Techniques
I got asked last week what camera I owned. I replied a "5D Mark Two". It impressed the person I was talking too. The fact is that no matter what digital camera you shoot with you will still want to get behind the principles of good photography and get good at them. There is in fact no such thing as specific photography methods for a Canon and a set of unique tricks and techniques for a Nikon camera. It's still picture making and light is one of your most important concerns.
Digital SLR Photography Techniques
You have bigger chance to be in charge of the digital camera if it is a dslr. There are more controls and more approaches to get the effects you would like. I am not saying that it's awful to have a compact camera. I am simply saying that you have better influence over the way your photos turn out. I have seen some spectacular images come out of point and shoot cameras because the photographer recognized the best way to examine and work with light and composition.
The main reason I use a Dslr is for the reason that I require more management over my image making. I want to be able to amend my focal length and have various types of lenses on the camera if I want. I also require the chance for high speed photography if the occasion calls for it.
I also want a really fast shutter speed at times. A really fast shutter speed takes place when you use a fast lens. This will mean that the maximum aperture of the lens is pretty wide. A lot of light can come in to the lens and you have additional light to work with. You may get a fast shutter speed this way.
Dslr cameras have more controls such as a high ISO, multiple shots per second, the ability for interchangeable lenses, the functionality to have an external flash and a lot more. You will still be able to get beautiful shots with a compact camera, but soon you will start feeling limited in what you can do.
To really become good at photography it's most ideal to be taught by a person who is experienced at it. This comprehension can save you years of errors and disappointments. Learn to master light, where you place things in the photo, your digital camera and you will have the structure to be an amazing photographer.
Article Source: http://EzineArticles.com/7629764
Wednesday, June 10, 2015
How To Avoid This Number One Mistake Others Have With Travel Photography
I spoke not long ago about travel photography. I'd like to discuss a particular problem with travel photography, and it's not with the camera, it's with us.
One thing that you might notice whilst travelling is the lighting differences between the place you are visiting and home. Your digital camera 'light settings' will still be set to where you came from, not where you are when you are travelling to.
Last year I went London on business and while I was there I discovered something very important. I had my trusty Sony set to an E/V of 1.0+. This really means, in English, that I had the eye of the camera adjusted to reduce some light because light here in Australia is so bright. I realised what a bright environment we live in down under when I went overseas. In a nutshell I had my camera set to 'Australian light settings', not 'UK light settings.' It's not really called a 'light setting', but I'll use that term for the purpose of simplicity.
When I got to London I looked at the viewfinder and everything looked really dark. I was confused at first but had a suspicion. So I took a few test shots to try out my feeling about what was happening. I was right I had the camera on the wrong setting for London light. My first test shots I focused the camera at the brightest part of the object I was taking and took the shot. As a result my pictures came out either too bright or too dark.
I then took the E/V up to 1.7+ and got the right shots. I got the right shots because I adjusted the amount of light that was coming into the camera. And to me, coming from such a bright place and going to London to me, seemed a darker place generally. Not bright, glary light like Melbourne. However this light is fantastic for digital photography if you have filtered light like this. In Australia we are constantly ranting "the polariser! the polariser!" But in London, at times, I could get away with not having it on the camera at all.
So please remember the first thing you do with that digital when you are travelling is to look at what you have the camera set to accept new lighting conditions. You may need to adjust the aperture if you are going from one continent and one season to another. Each season has a different light and varies from country to country. Article Source: http://EzineArticles.com/223453
Sunday, June 7, 2015
The Trick To Photographing Beautiful Flowers
There are flowers and there are flowers. Not all flowers are equal in a photography sense. Some can look like they are easy to photograph, and in reality can be a pain in the neck to try and get all the detail. Others are fantastic, they look fantastic, they are easy to photograph and the picture comes out how you want! And then there are the ones that surprise you. They look average and uninteresting but get in close and you are staring at the surface of another world. All the curves, lines, colour comes out when you take the picture.
Some flowers look better very close up because of their size and detail. Perhaps with a smaller flower, it may look uninteresting from an arms length away but get it up close and it may look magnificent (Small yellow daisies, Rock Rose.)
Other flowers such as the rose really look good from any distance, mainly because they are beautiful and because we know what flower they are. But just because we already know what it is doesn't mean we need to cut corners with our photographic artistic skills.
Flowers are a matter of personal taste. So which one do we start with? Your favourite one is the best place to start. A beautiful as a big garden rose in bloom with the fragrance that should be bottled and sold, for example, will not only inspire you but you'll want to spend time getting a great photo of it.
Each flower, depending on size and colour, will need to be photographed differently. I would photograph a Rose differently than I would a Jasmine flower, or an Impatien.
Then I would also photograph that Rose differently at 3 o'clock than I would at 10 o'clock. I would also photograph the Rose vastly differently in the Summer time to the Winter time and again vastly differently outside to inside. I would also photograph it differently depending on how close or how far I could get to it. And depending on the type of flower I'd even ditch the colour medium and do some black and white or sepia mediums with it.
What's that I hear you say? Flowers can't look good in anything other than colour? Oh that simply isn't true! Wait till you take some black and white shots with flowers and you'll be amazed at just how well they come out.
As I mentioned there are 5 things you must do in order to get your shots of flowers looking spectacular. There have been a lot of photographs I've seen of flowers but not with the intense colour, details, patterns or delicacy that exists in real life. These things will eliminate that for you, forever.
Flower photography is a great photographic pleasure. One secret is to always shoot a simple, uncomplicated look first. It's much better to aim for 'simple' rather than cram a lot into your flower pictures. If you look at professional photos of flowers you will notice that the best ones are always the most simple. Best images are always simple and to the point.
The worst flower pictures I've seen are those with too much in the photograph. A nice bunch of flowers can be ruined by too much to look at, or not being sure what to look at. Such as a bunch of flowers and your eye doesn't focus on any one thing. You eye in act is left trying to work out what the photographer wanted you to focus on. Such a crowded picture can be quite distracting.
So if you want 'wow' shots, then use less in the shot, and go for a composition that focuses on simple shapes, lines and forms. If you are doing colour pictures of flowers, then look for the colour that stands out the most and ask yourself how you can enhance it with the tools you have on you right now.
A really good flower picture gives you the same type of view as if you were actually really there, and giving you the same feelings. Decide on your composition: visually frame your composition first.
To work out what your composition is going to be, look to the left of the scene then look to the right. If you had to capture it, where would the sides of the picture be? If you are not sure how to find the 'edge' of the photo, you can mount your digital on your tripod and start at one point and take the picture. Move it a little to the right and take the picture again, and keep going until you come back to where you started. Using a tripod keeps the camera level and you are taking in everything. You'll find a good shot out of this.
Your lens is most important for making flower photography look impressive. Have you ever taken a picture of a beautiful Rose that looks like it has not detail or true depth and it turns out flat and uninspiring? That's because you may not have the lens. Choosing the right lens is extremely important. If you're not sure what lens to get for flower photography- which are always medium to close up shots-, or what works best and you're most comfortable with, try a few different focal lengths.
Article Source: http://EzineArticles.com/215428
Thursday, June 4, 2015
People Photography Made Simple
One of the great things about taking photos of people is their every-changing expressions, moods, and look in their eyes. When taking photos of people, you can have several opportunities at once. If you sat in a room with someone for an hour, how many different photos do you think you could get? Even just a slight turn of the head, an unexpected smile or a pensive look, will each give you a great photo subject. Ask your self, what is typical of this person? The way they move? Their gestures and their facial expressions?
The most wonderful thing about 'people photography' with a digital is that you can see what the picture of that person is like on the LCD even before you take it! You can position the light in the way you want it, take the picture and if it still isn't right you can take another one until you are satisfied with the lighting. You can even do a few in black and white, a few in sepia and a few in colours, change the ISO as you go and generally have a fabulous time. Or you can just delete it there and then. You can try all this, plus shoot them at different angles, and everything between. And if you have colour filters.....well, you are only limited by your imagination.
It is always great taking photos of friends using your digital camera, because you can always show them the shots you have taken instantly. Of course they do always want to see the shots immediately. I tell them to wait, because it slows the creative process for me the photographer and it will make them too self conscious, when the best shots are natural and relaxed.
So in order to take great shots of people, you have to be artistic and natural, which is a combination of a good artistic eye, confidence in camera handling and usage, and confidence in your own ability. And attending to the technical aspects, as well, which is understanding composition and good lighting.
Taking good photos of people requires a good amount of pre-emption. You see a good photo of someone relies on their natural goodness to shine through. In order to do this, as a photographer, you need to be able to either bring this out or capture it. The best thing to do is pretend as if you were a fly on the wall and pretend that they can't see you if you are in a social situation. I have been asked to be the photographer at many social occasions because my own style of photography for people is candid. Candid is better. And when people see me and the camera and put on a posed, unnatural shot I simply turn away politely and wait until they are smiling and laughing and go back quickly and take the shot. They usually say "But I wasn't ready!" And my reply is "exactly!"
If you are in this situation of a social environment like a dinner or a party, and you want good natural shots of people, then the first thing to do is watch people for a while. When you watch people you can then establish the relationships they have, who they naturally levitate to and how they settle into a conversation. Once you have seen this, then you can mentally assess when the best time to take the picture will be. What you are doing is getting a feel for what the emotions and energy of the people is like. The energy of the people will determine your photograph. Article Source: http://EzineArticles.com/215424
Monday, June 1, 2015
Simple Tips To Enhance Your Photography
Have you ever noticed how some black and white photos just stand out? And when you go to try and take the same kind of photo it just doesn't do the same thing?
There are a couple of starting pointers that I want to share with you about black and white photography with a digital camera. The first thing I can tell you is that to make a good black and white photo you must have good texture. Texture, or what something is made of, seems to be enhanced with grey scale.
Certain textures, such as natural textures seem to respond well in black and white. Black and white is all about capturing a sense of the dramatic, so if your subject has texture that is naturally dramatic, then you have the first step to a good b&w photo. Textures such as wood grain, stark metal, repeated patterns in nature such as waves or spirals seem to work well in black and white.
With black and white, try to keep some symmetry in your texture. Its easier to create stunning black and white photos when you have symmetry in your texture because it can sometimes be lost in color. Symmetrical textures in black and white are consistently beautiful and offer something the eye cannot capture as well when working in color.
Grey scale is not just the absence of color, or everything taken in shades of grey. To understand and master black and white photography with your digital you must understand the concept of grey scale.
Grey scale is a spectrum of black, lots of grey and white, like the colours of a rainbow but in a series of black and white and grey tones. You see a black and white photo is not really only black and white; it is actually lots of different shades and different depths of grey. So when we talk about grey scale it just means the way we measure tones of grey. Included in the grey scale is of course black and white.
This sounds odd to say, but when finding what looks good in black and white you can start with high contrasting colors in your every day subjects at home. Stark colours such as red, deep purples and bright yellows can make a really good starting point. With bold colours such as these, your camera will interpret them differently. It's almost as if the camera leaves out what the eye distinguishes as that particular color and keeps the intensity there. I won't go into the technical jargon now, but for now, just try experimenting on those colors. If you can't find these colors around your home, try going out into the garden and taking flowers that have these colors, or go to a nursery, plant store or public gardens.
You see black and white is not just 'no colour'. Its so much more, so much deeper then that. The purpose of black and white nowadays (as opposed to when it was the standard and people had no choice) is that it creates a sense of stillness in time, and with the right perspective, a great story.
Article Source: http://EzineArticles.com/215418
Subscribe to:
Posts (Atom)